

Log Cabin Living: Restoration Part 3 - Before & After!
- Jun 8, 2021
- 2 min read
Welcome to our log home.
We fell in love with it the moment we saw it, and never felt the burning need to change it in any way.
Before:


However, as time goes on, our concern for the logs that make up our 4 walls grew - we wanted to maintain them and care for them so that they last.
The importance of washing and restaining grew on us, and we opted to dive in with a sizeable DIY project.
In our prior posts about this restoration series, we discussed our stripping and washing process. Here are the during pictures:


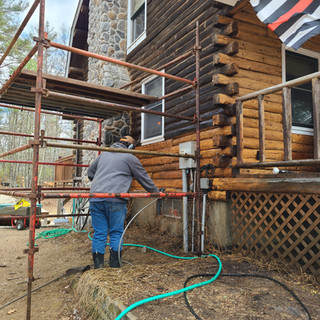


We were surprised to find that the logs were in good condition under a layer of dark mildew. They lightened beautifully.
We utilized a strong power washer, and Permachink's chink filler for log checks that were identified during the washing process.
The end result came together fairly quick for 1.5 people working the project. The biggest help was the use of a boom lift to reach the high points and an airless paint sprayer to get fast and even coverage.
We can now say that our home is protected from UV, further mildew, and cracks - while also breathing life back into it. We take such pride in this place, having now touched literally every square inch of the exterior ourselves.
After:

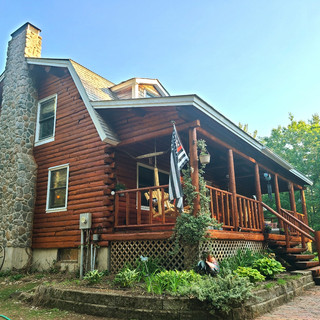


The warm red cedar sets a cozy tone and the gloss top coat shines in the sun. An updated front porch floor and railings beckons us in.
We saved thousands doing it ourself, but it was definitely hard work. Nothing adds up like sweat equity!
Grateful that the weather cooperated for us during the Spring to get it prepped and done before summer takes off. Happy to be able to sit and swing on the front porch, knowing the logs are protected and beautiful!


Comments